Hydro dipping has become a highly popular painting process. You can paint almost any type of material, such as plastic, glass, metals, hardwoods, and other objects. The way it creates a unique, eye-catchy, and three-dimension-like appearance is undoubtedly worth it.
But how to hydro dip with spray paint? Though it is a little tricky, completing the painting session will be fine if you know the correct procedure. This unique water transfer painting method can help you get a durable finish.
Here, I will mention the perfect approach to hydro dipping step by step. As a bonus, I will also discuss the typical mistakes beginners make and how to achieve precise results from hydro dipping. Let’s start without further ado!
Table of Contents
How Does Hydro Dipping Work?
Hydro dipping can be applied on various types of objects or surfaces. At first, you will apply your preferred paint to the water surface.
Next, the object or item you want to paint will be placed inside the paint liquid. Then, equally applying the paint throughout the surface will be necessary.
Before the paint dissolves in the water, you need to stick the paint on the object. Letting the paint adhere perfectly to the surface will require a little push.
Do You Need A Base Coat for Hydro Dipping?
Applying a permanent base coat is necessary to get a precise result for your hydrographic project. Use the suitable primer and base coat purposely made for hydrographic printing.
Once you apply the base coat, letting the surface dry is crucial for a long-lasting and attractive finish. Generally, you should use white color when applying a base coat for hydro dipping. But if you create a camo design, you can also use a tan color.
Can You Apply the Hydrographic Design Once the Base Coat is Dry?
A base coat plays a critical role in getting a precise hydrographic outcome. After applying the base coat correctly, you need to let it dry thoroughly before applying the primary paint. So, the patient is the key to this water transfer printing process.
Generally, a base coat may take around 2 to 3 hours to dry. It may dry quickly or slowly, depending upon the surrounding temperature conditions. Cooler temperatures will slow the drying process, while hot weather will fasten the drying process.
But your point of convergence should be on getting your expected result regardless of the condition. One practical tip is warming up the paint before applying it.
This will make the paint looser, allowing you conveniently apply it. You can test a small area of the paint to test whether it is adequately dried. But avoid ruining the whole design.
Do You Need to Use Warm or Cold Water in Hydro Dipping?
Slightly warm or hot water seems perfect for hydro dipping. The water temperature should be around 80 to 90 degrees Fahrenheit. However, if you want to use cold water, it is okay too.
One key point to remember is keeping the area free from residues. Your point of convergence should be achieving a very dull appearance. You may have left any residue inside the painting area if you notice any shiny spots.
How to do Hydro Dipping at Home?
What do you need to hydro dip with spray paint at home? Some supplies are necessary when you decide to go for homemade hydro dipping. Here is the list of materials you will need for hydro dipping:
| No# | Necessary Items |
| 1 | Lukewarm water |
| 2 | A transparent bulky container or bowl to entirely immerse the painting object |
| 3 | Oil-based spray paints (Several colors) |
| 4 | A compatible primer to apply the base coat |
| 5 | A topcoat spray paint (matte or gloss finish) |
| 6 | Masking tape to protect any unwanted area |
| 7 | Protective equipment to safeguard you |
Many online and offline shops offer all kits in a package. You can buy them if you have decided to use them for painting a few items. Alternatively, separately buying everything is also okay. Calculate how many items or quantities you need and purchase according to it.
How Do You Prepare the Object to Be Dipped?
At first, you take enough preparation to prepare your painting object properly. Clean your desired items properly to clear out any grime and dirt. If it is an old item, crevices and grooves need to clean thoroughly. This will ensure better paint adhesion.
Grab the masking tape to cover all the unwanted areas you don’t want to paint. For instance, apply tape to the lower part and sides if you want to hydro dip footwear.
If it has any logo, cut the tape in a square shape and put it on the marked area. Make sure you don’t use the tape where you want a hydro dip. Check all corners and nooks.
How to do Hydro Dipping with Spray Paint: A Step-by-Step Guide
You must follow the entire procedure to complete your hydro dipping process.
Step: 1— Applying the Base Coat
The first step is applying a base coat using a compatible color. Its color should be white or clear. Make sure to coat the entire object with primer. It should be a light coat. Only apply a little.
Keep the painted object in a good-ventilated zone. It needs to be dry properly. Waiting around 2-3 hours will be necessary. Check out the base coat after two hours if it has dried properly.
Step: 2— Adding Water Inside the Container
Pouring adequate water into the container or bowl is the next step. It should be ¾ of the container. Avoid refilling it fully. Otherwise, it will overflow.
However, adding enough water is vital to ensure the painting object doesn’t go to the lower area while dipping it. Lukewarm water will be the best choice.
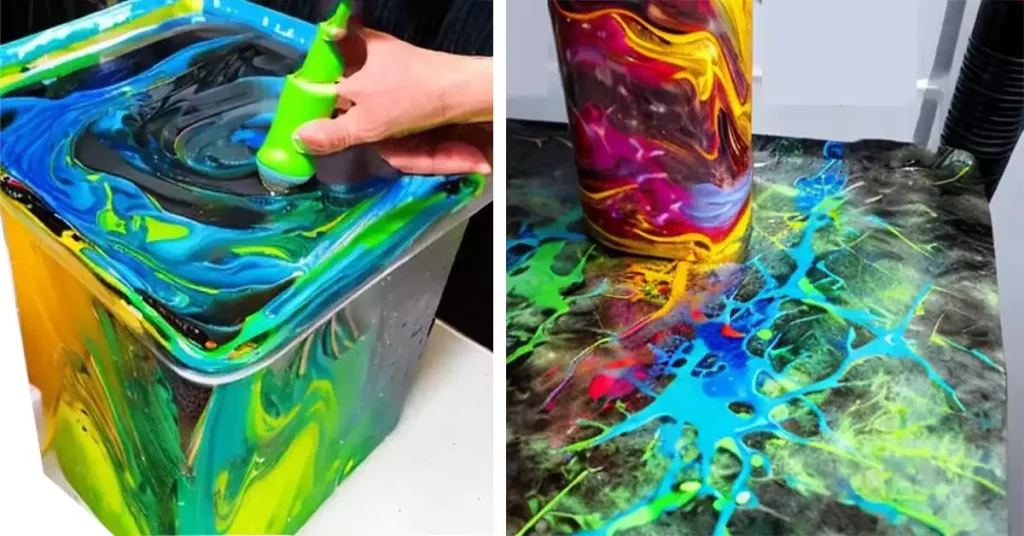
Step: 3— Applying the Spray Paint
Apply your preferred spray paint directly on the water surface 6 inches away. It will ensure no water splashing issues. Apply several colors depending on the pattern you want.
Stir the paint adequately to achieve a distinctive pattern. If you want, you can apply paint in different spots on the water surface to get a particular painting design.
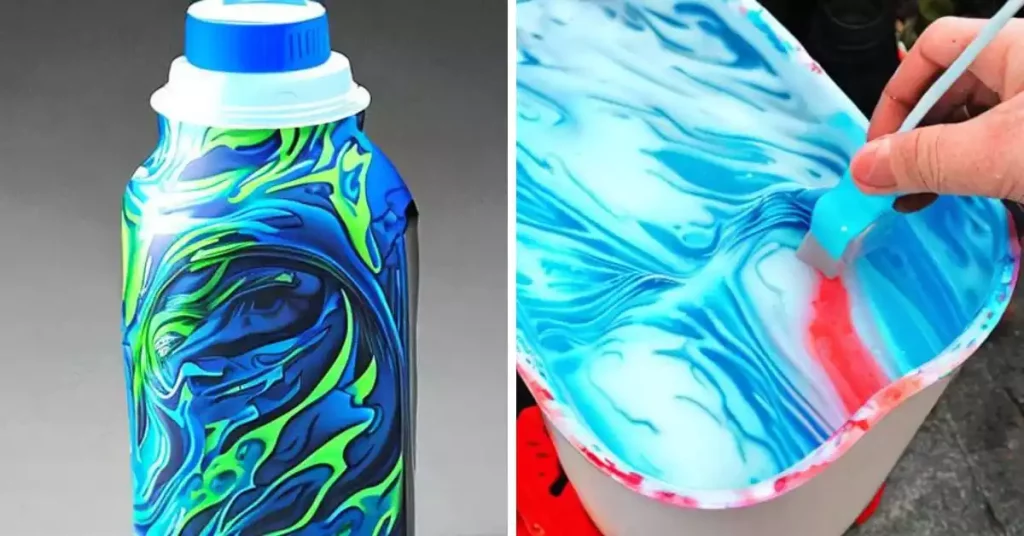
Step: 4— Dipping the Preferred Object
Here comes the time to dip your preferred object. Place the item inside the water container and put it lower slowly. Don’t pressure it.
Once it is fully submersed inside the water, don’t lower it anymore. You should not place it in the bottom area since the paint needs to adhere to the upper part.
Step: 5— Taking Out the Painted Item
Now, use a stirrer to move the paint from the closed area. You need to clear the paint surface. Additional paint should not reach the object.
Inspect properly if the paint has sat on the surface properly. Finally, pull out the entire object by holding it from the corners. Make sure no extra paint is picked.
Step: 6— Drying the Paint Properly
After removing the paint from the water surface:
- Keep it in a well-ventilated area.
- Dry it fully.
- Don’t use any drying machine. The natural drying process will be okay.
Make sure dirt or dust doesn’t sit on the paint surface. Or, it may not be as smooth as you prefer. Keep kids and pets far away from the work zone to prevent them from touching the paint.
Step: 7— Applying the Top Coat
The final step is applying a topcoat. This will ensure better protection for the primary paint. Depending on your preferences, you may choose matte or glossy finishes.
Applying 2-3 topcoats is necessary. Maintain enough drying time between each coat. Finally, dry the entire paint for several hours. That’s it!
How Long Should Spray Paint Dry After Hydro Dipping?
Generally, it is a good rule of thumb to let the paint dry for 24 hours after hydro dipping. Make sure the humidity level is not more than 60%.
You need to give enough curing time to let the paint dry completely. The paint may sometimes become fully dry within 8 hours, especially during hot weather.
Once the paint surface is fully dry, touch it with your hands. You should not have any tacky feel if it has been cured appropriately.
Do You Clear Coat After Hydro Dipping?
Applying a clear coat or topcoat is necessary regardless of any object you hydro dip. Apart from sealing the ink, you will get a clear and smooth finish.
You can apply a matte, semi-gloss, or high gloss clear coat based on your goal. Applying 2-3 coats, depending on the painted surface, will be necessary.
How to Take Care After Hydro Dipping?
Humidity and extreme temperature conditions are two main culprits for destroying hydro-dipping paints. Hence, proper storage is vital to keep the paint safe and ensure a longer lifespan.
Store the paints in less than 60% humidity conditions. Plus, keep the room temperature between 65 to 75 degrees Fahrenheit.
Mistakes to Avoid While Hydro Dipping
A newbie will need a bit of time to learn how to hydro dip with spray paint and water. You may not have a perfect finish on the first attempt. After all, it takes a little practice.
Here are some common mistakes beginners should not commit while spray painting new objects.
- Don’t apply a too-thick or too-thin layer of paint. Its thickness should be perfect. Otherwise, the paint will adhere poorly to the painted surface precisely.
- Don’t rush while putting the item inside the paint and move it outside the container. Maintain a consistent pace to avoid damaging the paint.
- Make sure you don’t move the painted object unnecessarily while immerging it. Otherwise, the paint position will be placed. Hold the object and move the water container precisely.
- Never hurried for any step. Take enough time to complete each step. Properly drying the paint in each session is crucial to get the best result. You can check my other article on how to make spray paint dry faster.
- Make sure the liquid paint doesn’t have any air bubbles. Otherwise, you will get a blotchy and patchy painting result.
Frequently Asked Questions (FAQs)
Can You Hydro Dip in Cold Water?
You should not use hydro dip in cold water. It will make the procedure slower. In some cases, the painting process may run off too.
Can You Hydro Dip Twice?
Yes, you can hydro dip twice if you fail to achieve your preferred outcome. But make sure to completely dry the painted object before hydro dipping for the second time. The paint surface should be free from water droplets.
Can You Hydro Dip with Spray Paint at Home?
Hydro dipping with spray paint at home is possible if you know the correct procedure. Collect all the essential items you need for hydro dipping, choose a perfect location to complete the job precisely, and let the paint dry at an ideal temperature.
What Temperature of Water Do You Use to Hydro Dip?
The optimal temperature for hydro dipping ranges from 65 to 75 degrees Fahrenheit. The weather condition should be free from excessively hot or cold. Otherwise, you may not get your preferred result. Considering the humidity condition is also vital.
Can You Use Gloss Spray Paint for Hydro Dipping?
Yes, gloss spray paint can be used for hydro dipping. It is important to use a specialized spray paint designed for hydro dipping in order to ensure the best results.
Wrapping Up
Are you still wondering how to hydro dip with spray paint? I have described everything above.
Knowing this procedure will ensure a precise result with few hassles. It is common not to get a perfect result the first time. However, it is also necessary that you choose the best spray paint for hydro dipping to avoid a lot of blunders.
After all, you will need to go through the process several times. It is better to hydro dip an unwanted item before finally painting. You will learn the correct technique from your mistakes.

Even though I have 10+ years of experience in the painting business, I am always trying to learn the latest coloring methods. I have been into colors since my teenage days. I spent a lot of time experimenting with new painting methods on multiple surfaces. Now, I want to spread my knowledge through my blogs and articles.